Miscellaneous items that didn't need their own chapter.
MODEL WINDOWS | USING TEMPLATES | CAMERA WINDOW | DATA READOUT | HELP WINDOW | SNAP & SNAP PALETTE | AXIS CONTROL | DEPTH CONTROL | GRID | COMBINING DRAG AND NUDGE | QUICKCOLORS | TEXTURES | MODIFIER KEYS | THUMBWHEEL | SLIDE WIDGETS | NUMERIC DATA | 3D CURSOR | COLOR BUTTONS | UNDO/REDO | REPEAT | CUT&PASTE | SHOW CLIPBOARD | HIDE / SHOW | GUIDE SPLINES
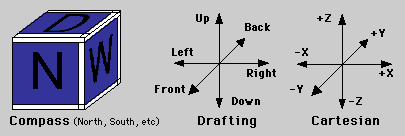
PatchDance provides 3 orthographic views of a model in progress. These windows "surround" a volume of space, allowing you to look at it from three directions. Their scales can vary, but they ALWAYS have the same center point. They have NO depth component: all objects within their field of view appear the same, regardless of their depth. The colors used can be set in the Preferences.
You are free to close any modeling window at any time. This is a good way to save memory. Closing all 3 modeling windows plus the Camera window will close the Project (you will have the chance to save your work or change your mind).
The Model windows are always aligned to their respective axes. The name of the axes can be changed if desired, as well as the name of the units. In both cases it is purely a user convenience: PatchDance has its own set of axes and internal unit of measure, which is translated into whatever the user prefers.
Think of the windows as "folding together" like a box to enclose the volume of space that (hopefully) contains your model. The direction of the window ("Down" for the upper left Model window, by default) is the direction that the window looks TOWARDS. In the illustration above, the "top" of the box is labeled down instead of up, because the user looks into the volume in the DOWN direction. (It has nothing to do with the actual "side" of the box -- it's not a label!)
This probably sounds more confusing than it is. If in doubt, try creating a small object in one window and observing how it appears in the others, then moving it around and watching it.
The Model windows have a control Button Bar at the bottom.
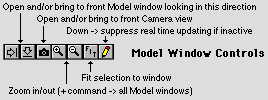
The arrow buttons open/bring to the front the Model window that looks in that direction. For instance, in the North or West windows, an arrow pointing down would refer to the Down window. This is convenient when using larger or overlapped windows, or when closing windows to save memory. A similar effect is available under the Windows menu.
The Zoom buttons normally affect only the current window; holding down Command zooms all three views (actually, their scales are matched to the current window rather than zooming independently.)
Fit works pretty much as expected. If the current window must be recentered, this applies to all three; otherwise the scale works the same way as with the Zoom buttons.
The Pencil (has a red bar when down / updating off) prevents real time updating in inactive windows (no effect on the active window). This is to reduce the load on the computer and improve interactivity when working with large models.
The Rulers take the place of scroll bars. They display position in space (2D), and update if the scale or units are changed. The ruler markings always align with the grid, if it is active. Dragging in a Ruler scrolls the view (of all 3 windows as appropriate). There is no equivalent of the scroll arrows / elevator box found in most Macintosh windows.
Data Readouts are the area where the buttons are normally found at the bottom of a Model window. These appear while the mouse is down in the window and display interactive information about the operation in progress. To see this in action, click and drag with the Arrow (A) and you'll see the current mouse position displayed. The data reported varies with operation being performed.
Templates are a new feature in v1.0 and later. They provide a means of importing an image into a Model Window which can then be used as a tracing pattern to shape an object. Each Modeling Window can have its own template, or none; templates are not currently supported in the Camera Window. This feature is accessed via the File Menu.
Notes:
The Camera window is a perspective view of the model. It is inactive unless a Camera and a Focus have been created (see Render Menu and Windows Menu, under Camera Options (Auto Create Camera)). It uses the same background as the modeling windows and draws splines or patches only (no Points). Once a Camera and Focus have been defined there is no way to delete them: you can either close the Camera Window or move the Camera and Focus very close together (close enough deactivates the Camera View).
The Camera Window can display a wireframe (spline only) or several shaded (patch only) versions of the model, including 3 different renderings using the QuickDraw 3D Interactive Renderer. Currently, shading uses only the QuickColors set for each patch.
The camera view is always FROM the Camera (appears as a small circle in the modeling windows) TO the Focus (a small X). These are created manually at the current cursor position or automatically in various ways. Creating a second one of either has the effect of moving the old one to the new position: you cannot have multiple cameras but you can store different settings of camera/focus/roll/zoom and move between them. The Focus has no actual focusing effect: it sets direction only.
The Camera window has a Control Bar at the bottom:
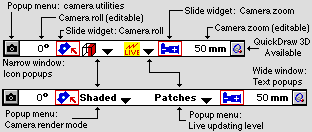
Two images are shown: the two popup menus in the center display either text or an icon if the window is too small for text. The operation is identical (there is only one icon - you can't determine the value of the popup by looking at it.)
The Camera Utilities popup (icon) has a variety of functions:
Camera Roll and Camera Zoom have the expected effects. You can type values into the fields, adjust the fields with the thumbwheel feature, or click and drag (horizontally) in the adjacent Slide Widgets to vary these values.
The Render Mode popup controls the type of image generated. Wireframe is obvious, Shaded is PatchDance's built in shaded rendering, crude but *very* fast and able to run in extremely little memory. The remaining rendering modes all utilize QuickDraw 3D (which must be installed). they provide progressively higher quality levels, and are progressively slower (they do make use of hardware acceleration, if installed.)
QuickDraw 3D notes:
The Live Update Level popup controls how the Camera view attempts to redraw in real time as you edit your model. It is turned off by default: it can be left on unless a model is so large that the computer can't keep up and interactivity begins to suffer. Obviously you can't live update patches while set to wireframe mode; you CAN update splines in Shaded mode (faster). IMPORTANT: it is not possible to turn off live updating with QuickDraw 3D.
The QuickDraw 3D Available icon replaces the standard Macintosh window size box when QuickDraw 3D is detected at startup. Be aware that this isn't rechecked as your model grows: QD3D may be present initially and still fail to work when requested, depending on the memory available. The only way to detect this is to try it (you'll see an alert).
The Help Window (also called the Prompt Bar) appears at the bottom of the screen. It cannot be moved or resized, but it can be closed if desired (see the Windows Menu to reopen it.) The state of this window is remembered between launches.
The Help Window provides advice / information.
Snapping is a standard function in computer graphics, meaning to precisely use a location (of an object, reference in space, etc.) rather than clicking the mouse and hoping it's "close enough." PatchDance has very comprehensive snapping capabilities, available via the Model menu, a floating palette (double or option click the Arrow (A), or type option-A), or by command clicking most Tools (using a preset snap mode).
The various snap types are (this is identical to the snap menu):
Snap the 3D Cursor:
Snap the current selection (Point by Point - the entire selection CAN end up at a single point.) Use Axis Control here, and see that section for more information.
The Snap Palette has not been integrated into the Operations Palette: it will probably be implemented as a tearoff menu when direct support for this is added by Apple. It is designed to look as much as possible like a menu. The current Tool snap mode is checked, and the Palette can be Zoomed to reveal a "cheat list" of the modifier keys that can be used (see Axis Control.) There is also a checkbox, Auto Snap, that when checked causes mouse clicks to snap the 3D Cursor to the current selection centroid with certain tools (such as the Rotator (R) and the Scaler (S)). This was a requested modification to provide more object-like behavior: it's possible to scale and rotate objects in the most commonly desired way without having to manually snap the 3D Cursor (the center point).
Axis Control (NOT the same as Depth Control) allows you to select which axes are used by the Snap function. It does not work when command-clicking to snap (not enough modifier keys!) but does apply to the Snap palette and the Model / Snap menu.
When using the Palette or menu, add modifiers as follows to control Snap (relative to the active window):
These can be added in any combination (except shift) to snap along any combination of axes. This is especially useful with Snap Selection, where it allows you, for example, to easily align objects to a line by snapping to the grid or the 3D Cursor along one axis.
Depth Control allows you to control depth in a Model window. Normally these windows ignore depth, but it is so convenient to simultaneously create a Shape and then extrude it interactively, or move something in one view instead of two, that this feature was added.
Generally, when dragging hold down the spacebar and vertical mouse motion will be treated as movement in depth. When you release the spacebar you can continue dragging in 2D.
NEW (v1.0b15 and later)
When the spacebar is released, the mouse returns to wherever it was
when the spacebar was pressed. This preserves the relative position
of the mouse to the original 2D object. This should be more intuitive
(especially when moving objects) but may take a little getting used
to.
Important
Depth Control doesn't work with everything. In particular,
the Trackball (F), the Rotator (R), the Scaler (S), and the Spline
Arrow (B) do not allow you to control depth this way.
The Trackball is actually a 3D version of the Rotator, and it is too complicated and confusing to combine them. The Spline Arrow actually rotates handles rather than simply dragging them, and this action is difficult to provide, as well as confusing.
PatchDance's grid provides a convenient way to align objects based on a space-filling rectangular system. Unlike 2D programs, the grid is a 3D assembly of BOXES rather than a 2D pattern: never forget that the grid works in DEPTH as well as horizontally and vertically.
The grid is controlled and adjusted from the Interface Section of the Operations Palette, and its controls are discussed there. It is displayed as a pattern of lines in the current Grid Color. Grid lines on all 3 axes are equal: grids that have different spacing along different axes are not currently supported. The grid always aligns with the Rulers within the resolution of the screen (actually, Ruler markings are adjusted to align with the grid).
The grid is most useful in conjunction with snap, to align Points to the grid. Axis control is also available when snapping. It is also possible (within limits) to reset the grid to existing geometry, by snapping the Cursor to a Point and centering the grid there, then snapping to another Point and setting the spacing.
PatchDance allows you to nudge the selection as usual, using the cursor keys. (You must have the Mover (D) selected for this to work. It is actually a Move variation).
A new addition is the ability to use the cursor keys WHILE dragging the mouse. This can be very handy for fine tuning a drag, or for tools that don't support nudging directly (you can, for instance, fine tune a rotation by nudging the Rotator (R) during a drag.)
There is no special requirement for using this: simply use the cursor keys while the mouse button is down. This works with Depth Control, and with most tools. The exceptions are the Marquee / Lasso (M) and the Trackball (F), and support for that is coming.
NEW (v1.0b15 and later)
The mouse arrow now moves onscreen when the arrow keys are used to
nudge. This keeps the arrow "on top" of the object being
dragged.
If you like using the arrow keys in this way but would like more
control, PatchDance's author also produces NudgeMouser, a Control
Panel that extends this behavior to the entire system and adds
several extra features. This is available for free to registered
PatchDance users (simply
download it
and request a license key from PatchDance Tech Support.)
QuickColors are the colors used in the Camera view. There are sixteen available (including Invisible), and they can be changed in the Preferences (except for Invisible). Their name reflects that they can be displayed very quickly, and allow real time operations using very little memory.
Colors can be set for individual patches, using the Texture menu. This has both a menu of colors and an option to open a small palette. Both respond to a number of modifier key combinations (list available on the Palette).
QuickColor changes affect all selected (all Points) patches. In Shaded mode, which doesn't offer realistic shading, the colors are permuted to break up outlines (a patchwork effect) and make the shapes of 3D objects easier to see. With QuickDraw 3D the colors are used as is, with whatever shading applies.
PatchDance supports Textures to a limited extent. Only the QuickColors can be displayed in any Camera mode, and no actual texturing features are provided. It is possible to assign a texture to a collection of patches. Texturing features are accessed via the Texture Menu.

The Texture dialog displays available textures and allows you to create, modify and assign them. It is also possible to select and deselect by texture. This dialog always displays a default texture this is initially called Default, and is checked to show that it will be assigned to all new patches.
New Create a new entry in the texture table.
Update Modify the current (selected) texture. Currently no effect (the only possible modification is the name, which can be changed by simply clicking and typing.
Assign Assign the selected texture to all selected patches. The count is displayed.
Remove Delete the selected texture from the table.
Select/Deselect Affects all patches of the current (selected) texture.
Default Set the current (selected) texture as the default (for all new patches). The default texture is checked in the table.
IMPORTANT Like names in the Hierarchy Dialog, the texture name you type is NEVER used by PatchDance internally. For this reason, changing the name has NO effect on any PatchDance operation, EXCEPT POV Ray export (where the typed name is significant.)
Textures and POV Ray When exporting POV Ray files, texture names are exported as POV Ray texture statements. This allows you to assign textures (for which you have a valid POV Ray texture description) to patches and have them automatically written to the file. Also see the chapter on POV Ray export.
Fields for numeric entry can be picky about what they accept. If the computer beeps and/or refuses to accept a keystroke, chances are you are trying to enter a value of the wrong type (some fields accept only integer values) or outside the allowed bounds: the allowed range (if any) is usually listed in the Prompt Bar at the bottom of the screen if you point to the edit field.
The thumbwheel feature allows you to quickly adjust a numeric value without having to type a new number. It's difficult to explain in print: type a value into an edit field, place the cursor in the middle, and press the up/down arrow keys until you see how it works. Note that the FIRST time you press a key, the target digit (if deselected) is selected but not changed. You CANNOT use the up/down arrow keys to move to the beginning or end of an edit box; use Home and End instead.
This is a small, low overhead replacement for the standard Mac slider type control. They are used only for interactive (real time) operations that provide their own feedback, and where there is not enough room for a standard slider. Examples are the roll and zoom controls at the bottom of the Camera window. When these are clicked and the mouse dragged (horizontally, in this case) the result is immediately displayed in the Camera window, as well as numerically in the edit fields next to the controls. Slide Widgets always have a red border, unlike all other controls.
Also called the Cursor (capitalized). It should be clear from the context whether the normal (mouse cursor) is intended. The 3D Cursor appears in the Modeling windows as a small cross in the current Marker color. It has several uses:
These are used to set colors. They consist of a small square of color with a black border. Clicking causes the Color Picker to appear. If a Color Button is Command-clicked,the Color Picker does not appear, but the current color is copied to an internal clipboard. (Note that the cursor becomes an eyedropper.) When a button is then Option-clicked (note that the cursor changes to a paint bucket) the copied color is pasted into the new button. This allows copying colors without having to write down numbers from the Picker dialog. See Preferences Dialog for an example of these buttons.
A new addition is the ability to enter colors in HTML format ( #rrggbb): to do this, shift-click the button.
IMPORTANT: The buttons on the QuickColor Palette are NOT Color Buttons: the standard QuickColors are changed in the Preferences Dialog.
PatchDance allows you to undo and then redo up to 99 actions (the default is 32). Undo is available from the keyboard or the Edit menu (the menu displays the title of the action to be redone, or Can't Undo/Redo, as appropriate).
Undo/redo information is saved with files (in native format only, of course). It is possible to open a Project and then use the stored information as though it had never been closed. This does increase file size, and can be turned off if desired in the Save options.
A few operations are not undoable:
Repeat operation in the Edit menu, when enabled, allows you to repeat some actions (mainly menu choices) where it makes sense. Its purpose is to reduce the number of menu command keys required: for example, if you need to subdivide several times and don't have a hotkey assigned, simply Subdivide once and then use the hotkey for repeat. Not all operations can be repeated.
PatchDance supports cut / copy / paste of the current selection in the standard Macintosh manner. The current position of the 3D Cursor is saved as well, and Option-Pasting (menu becomes Paste At) causes the pasted objects to appear offset based on the current 3D Cursor location. This is most useful when the Cursor is snapped to a Point just before Copying or Cutting: you can then Paste At and have the Object appear in the same place relative to the 3D Cursor.
It is possible to Cut & Paste between applications that
support QuickDraw 3D. Pasting into PatchDance always works if
QuickDraw 3D is active. Moving objects from PatchDance
requires converting the clipboard from PatchDance's internal format
to QuickDraw 3D form. As this is a time consuming operation, it is
turned off by default: it can be turned on in the
Preferences or temporarily
in the Operations Palette.
Clipboard conversion only happens when switching to another program;
this setting has no effect if you remain in PatchDance. Pasted At
does not work for information in QuickDraw 3D format.
TIP: If you need to copy one object to another program, using
the Show Clipboard command causes the clipboard to be converted to
QuickDraw 3D (for display) even if automatic clipboard export is
turned off.
Cut & Paste of numeric / text data among edit fields works as expected: it is completely separate from the 3D Objects clipboard.
This opens a small window and displays the contents of the 3D clipboard. This requires QuickDraw 3D to work, and uses the standard QuickDraw 3D viewer. The ability is provided to rotate, move, and zoom the object(s), but requires a fast computer to do so in a reasonable amount of time.
Points (and their associated splines and patches) can be hidden or shown. Hidden Points are not drawn in the Model Windows (they may or may not appear in the Camera view). This is useful to remove clutter and to speed screen redraw.
You have a large set of choices: Using the Model / Points menu you can hide all selected or unselected Points, show as selected or unselected, and hide / show by name using the Hierarchy dialog.
This corresponds to the Lock feature found in most programs. Splines can be converted to and from Guides with the following properties:
There are a number of options for Guides, controlled by the Model / Splines menu. You can convert all selected (both endpoints) or deselected (either endpoint) splines to Guides, or release all Guides. You can also convert a single connected object by snapping the 3D Cursor to any point, or release a Guide object the same way.
Releasing Guide objects in this way is obviously impossible if no Points are visible (the Cursor cannot be snapped). This is used when an object is selected and converted to Guides except for a single "tail" spline and Point which is deselected. This provides a single Point that is part of the Guide object that can be used to release the object without having to release all Guides in the Project.