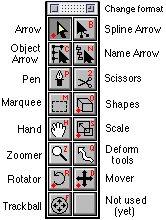
This is the two-column (default) Tools format, which works best for this purpose. To try out the one-column vertical and horizontal layouts, click the Zoom box (Change format). The current Tool format and position is saved between launches.

Used to work with individual points. The Arrow has a dialog (the Snap Palette) which is covered separately.
Edits splines. Similar to 2D drawing packages. This tool cannot be used to set the cursor: clicking in empty space (or missing the intended target) causes a warning beep and no further action.
Clicking a Point displays all handles connected to that point; Command-option-double click ing a Point OR a visible handle deletes it (a handle is actually moved on top of its Point, creating a segment).
Double-clicking a Point or handle attempts to smooth all splines attached to the Point (or the handle's Point). Option-double-clicking affects only SELECTED splines (actually, the Point itself doesn't count, only the other endpoints of the splines attached to it). This is useful when there are more than two splines, since otherwise the smoothing operation is unpredictable.
Dragging a Point is the same as dragging with the Arrow (A); dragging a handle normally moves ALL visible handles on a point and can have a variety of other effects, depending on the modifier keys (may be combined):
IMPORTANT: Depth Control does NOT work with the Spline Arrow.
The effect of the command and option keys on handles lasts only as long as they are down: if you wish to produce a corner or fair curve, you must ALWAYS hold the appropriate key down while dragging EITHER handle or they will instantly realign. Option-dragging a point (to create a corner), however, does NOT cancel when the key is released (but you may smooth the resulting corner by adjusting either handle without the option key, or by double-clicking the handle or corner Point.)
When a point or handle is clicked, the cursor changes to a Drag Arrow (no arrow "shaft") to show that you clicked on a valid point or handle.
Operates on connected objects. Clicking on any point of a connected object affects all points:
Move (drag) the current selection.
The Mover operates in conjunction with the Move section of the Operations Palette, which can provide numeric moves / results of interactive moves and optional settings, such as Interactive Extrusion. Interactive Extrusion can also be activated via a popup menu in the Extrude dialog, or by holding down the Control key while dragging. The connecting splines generated are the same type set in the Extrude dialog.
Two tool modes are supported: Both use the command key to Snap. Mode 2 is set when the Caps Lock key is down.
Behaves like a trackball, allowing you to freely rotate objects in three dimensions. The behavior is modeled after a ball where you hold your finger (the mouse pointer) steady (rather than "rolling" the ball).
Modeling Windows: Click and drag to rotate the current selection around the 3D Cursor. A circle will appear (70% of the window's smallest dimension in diameter). Outside this circle (centered on the Cursor) the effect is to rotate the selection around the window axis. This simulates spinning a trackball around and is functionally the same as the Rotator (R).
Camera Window: The trackball does work in the Camera view.
It is possible to move the entire selection (as usual) if the Control
key is down, or to move only the Camera (Control up).
Rotation is always around the window center (the focus) and no circle
is drawn. Bear in mind that the effect is based on the line joining
the camera and focus, NOT the orientation of the selected points as
seen in the Modeling Windows.
The shift key can be used to constrain drags as usual. Also, checking the Auto Snap checkbox in the Snap Palette will cause the 3D Cursor (the rotation center) to snap to the centroid of the selection on each click.
Drags the view window (moves the view). Standard Mac tool. Always affects at least TWO windows (i.e., moving the Down view to the right (east) also moves the North view to the right). Shift constrains (90°). This has NO EFFECT on the Camera View.
This tool can be temporarily accessed by holding down the spacebar, THEN dragging in a Model window with ANY other Tool.
Changes selection of points in an area. This is a standard Mac tool, but it has extra capabilities that are NOT standard. The result depends on the modifier keys when the mouse button is RELEASED; the marquee/lasso color is updated to reflect this. Try dragging in a window and pressing the various keys to see it in action. You cannot change between the marquee and lasso on the fly.
Operates on named Objects. This tool can behave like the Object Arrow (C), except that it drags or changes the selection of objects by name: this means the entire named set belonging to the clicked Point (Spline and Patch names are not used) or the Object to which the clicked Point belongs.
The Name Arrow also has other functions that are specific to various Object types. For more information, see the Object Arrow (C) and the Objects section of this Manual.
Creates objects. Dragging produces the current object set on the Shapes section of the Operations Palette (default: circle by diameter). There are many options and most operations can be performed numerically. Most captions change to reflect the selected object type.
Clicking and holding the icon for the Shapes Tool displays a popup menu of all the available primitive shapes and modes (the same menu is found under Mode / Shapes.) The menu can be either text-based or iconic.
Depth Control works with shapes, and provides interactive extrusion. The mode is as set in the Operations Palette (defaults to Extrude Centered on Cursor if 2D mode is set and Depth Control used.)
Creates Bezier splines. Designed to emulate standard 2D drawing tools as closely as possible. For the best results, do not exceed 120° of curvature in a single spline (90° is even better).
When editing segments: there is no equivalent of the Adobe Illustrator Convert Direction Point function. Segment handles (on top of their associated Points) may be dragged off and adjusted normally (one at a time.)
Moves groups of points in (usually) nonlinear ways.
This Tool actually consists of several different functions, selected
from a popup menu (like Shapes) on either the button or under the
Model menu.
Magnet (T) (Originally a separate tool, hence the hotkey). Moves groups of points. Sometimes called a Gravity Tool in other programs. Must be learned by experiment; used for "modeling clay" type effects.
Bend. Overlays a single (ghosted) spline over the selection, then bends the entire selection as the spline is adjusted. Still under development. The Bend Control Spline is drawn slightly different than usual: the handles are small hollow squares, the endpoints are not actually visible. You do not have to click an actual handle or endpoint, the closest is always used.
The remaining operations are related, as variations on simpler tools. They essentially allow you to operate on groups of points in simpler ways that doing it "by hand." They use similar modifier keys:
Taper. Actually a variation on Scale (S), whose effect
varies with depth.
Twist. Actually a variation on Rotate (R). Rotation varies
with depth, allowing "candy cane" effects.
Shear. Actually a variation on Move (D). Linear shear effect,
producing slanted objects.
Depth Control is not available with Deformations, except for the Magnet Tool.
Rotate selected points around the 3D Cursor in the current view. Rotation is always in the plane of a modeling window. This tool operates in conjunction with the Rotate section of the Operations Palette. Rotation angle is always visible in the Data readout of the Model window, and can be read into the Operations Palette as well.
Checking the Interactive Lathing checkbox in the Operations Palette causes rotation operations to become Lathings. Currently there is no visible difference with the tool (the lathed splines are not ghosted). This allows convenient construction of "partial" lathings.
Clicking the Auto Snap checkbox in the Snap dialog causes the Cursor to be reset to the calculated centroid of the selected points for each rotation: this causes Rotate to behave in an "object oriented" manner which may be useful at times.
In a Model Window:
Depth Control is not available with the Rotator.
Scales the current selection. This Tool operatoes in conjunction with the Scale section of the Operations Palette, which contains several options. Scaling factors are always visible in the Data readout of the Model window, and can be read into the Operations Palette as well.
The Scaler does not behave exactly like similar tools you may have used. It is most effective when a point is clicked and "dragged": the selection is then scaled so that the point stays under the mouse. This is intended to allow easy scaling of an object to fit. You can command-click at the beginning or end of a drag to snap.
The Scaler Dialog will accept 0 as a scaling factor. This has the effect of placing all selected points on a line through the Cursor along a given axis. This is identical to (and in fact, performed by) the Snap Selection to Cursor function.
Depth Control is not available with the Rotator.
Zooms and recenters the view. ALL windows are recentered (since they share the same center) but only the clicked window is rescaled (unless Command is down). Having different scales in the modeling windows is often useful but can become very confusing. Watch the rulers!
Note that there is no Fit Selection To Window option: this is done with the FIT button at the bottom of each Modeling window.
The Magnifier buttons at the bottom of the Modeling windows have the same effect as clicking the Zoomer but DO NOT recenter the view.
Cuts a spline into pieces. The only tool that works on a spline rather than its points or handles. The Scissors generally behaves exactly like the Spline Arrow (B), with one exception (cutting a spline). Clicking on a spline cuts it into 2 pieces, installing one new point. The overall shape of the spline does not change.
If the Option key is up and any spline handles are showing, the Scissors ONLY works on the spline(s) with visible handles. This is useful when there are many splines in a small area and there is a risk of getting the wrong one. If no handles are showing or the Option key is down, the tool looks at all selected splines.
Especially when cutting all selected splines, the scissors will cut the FIRST spline they find within a few pixels of the clicked point: this may not be the one you want if several are close together. Click one point on the spline you want to divide (to show the handles), and the tool will ignore all others regardless of selection.
WARNING: Cutting a spline that is part of a patch will DESTROY the patch (creating a hole) even if the resulting shape is still a legal patch. This tool is primarily intended for editing 2D paths that will be used in 3D forming operations. If you need to divide a patched surface, see Subdivide below (preferably) or remember to create new patches.
Not used. There'll be a job for it in a later release.